How I'm using Airtable to track my knitting and sewing projects
Last Updated August 4, 2020
Like I said in my last post: if you know me, you probably know that I love Airtable. Since a lot of people aren’t familiar with it, I thought I would write up some details about how I made my Making Database Template (which you can copy for free!), which I’m using as a replacement for Ravelry as well as a new place to combine information about my different crafting projects into one location.
I’m going to use some Airtable lingo in this post, so I’ll also link you to Airtable’s Guide to the Basic Field Types for explanation in their own words. Airtable has pretty robust documentation, and I’ve found that once you get the hang of linking records to each other across tabs, it’s pretty easy to get the hang of.
One of my favorite things about Airtable is the ability to link records together across tabs. When I do that, tt creates a two-way link between the records and the tabs. For example, when I link my Knitting Make to a particular Knitting Pattern from the Makes tab, it also creates a corresponding link from the Patterns tab back to the Make as well, and both of those links and associated lookups and formulas are updated when a record changes.
My second favorite thing about Airtable is the lookup function: once I’ve linked one record to another, I can pull in information from that other record into the tab I’m looking at (or, I can lookup that information). For example, when I’ve linked my Knitting Make to a Knitting Pattern, if I want to display the designer of the pattern on my project record, I can just add a lookup field that pulls the designer’s name in from the Knitting Pattern record, and doesn’t force me to duplicate that information.
How To Use This Blog Post
This post turned out super long, so please feel free to jump around, use control+F, or just look at the pretty pictures. For each section, I pulled out the fields that I did the most with, or which require some explanation — the ones that link to other records, the formulas, the lookups, the complicated stuff — and am assuming that you’re all familiar with the concept of text fields, date fields, and drop-down lists. And just to reiterate, I customized this for me and the types of projects I do — this is by no means a full template or an exact set of rules! Take what is useful out of this for your own Airtable, change whatever you want about it, and feel free to delete what you don’t want. For example, I don’t mention crochet that much in this post because I don’t crochet, but I included crochet as an project type option in my Knitting tabs and you can use it the same way you would for a knitting project. Similarly, if you’re not a spinner or sewist, you can just delete those tabs.
Sewing
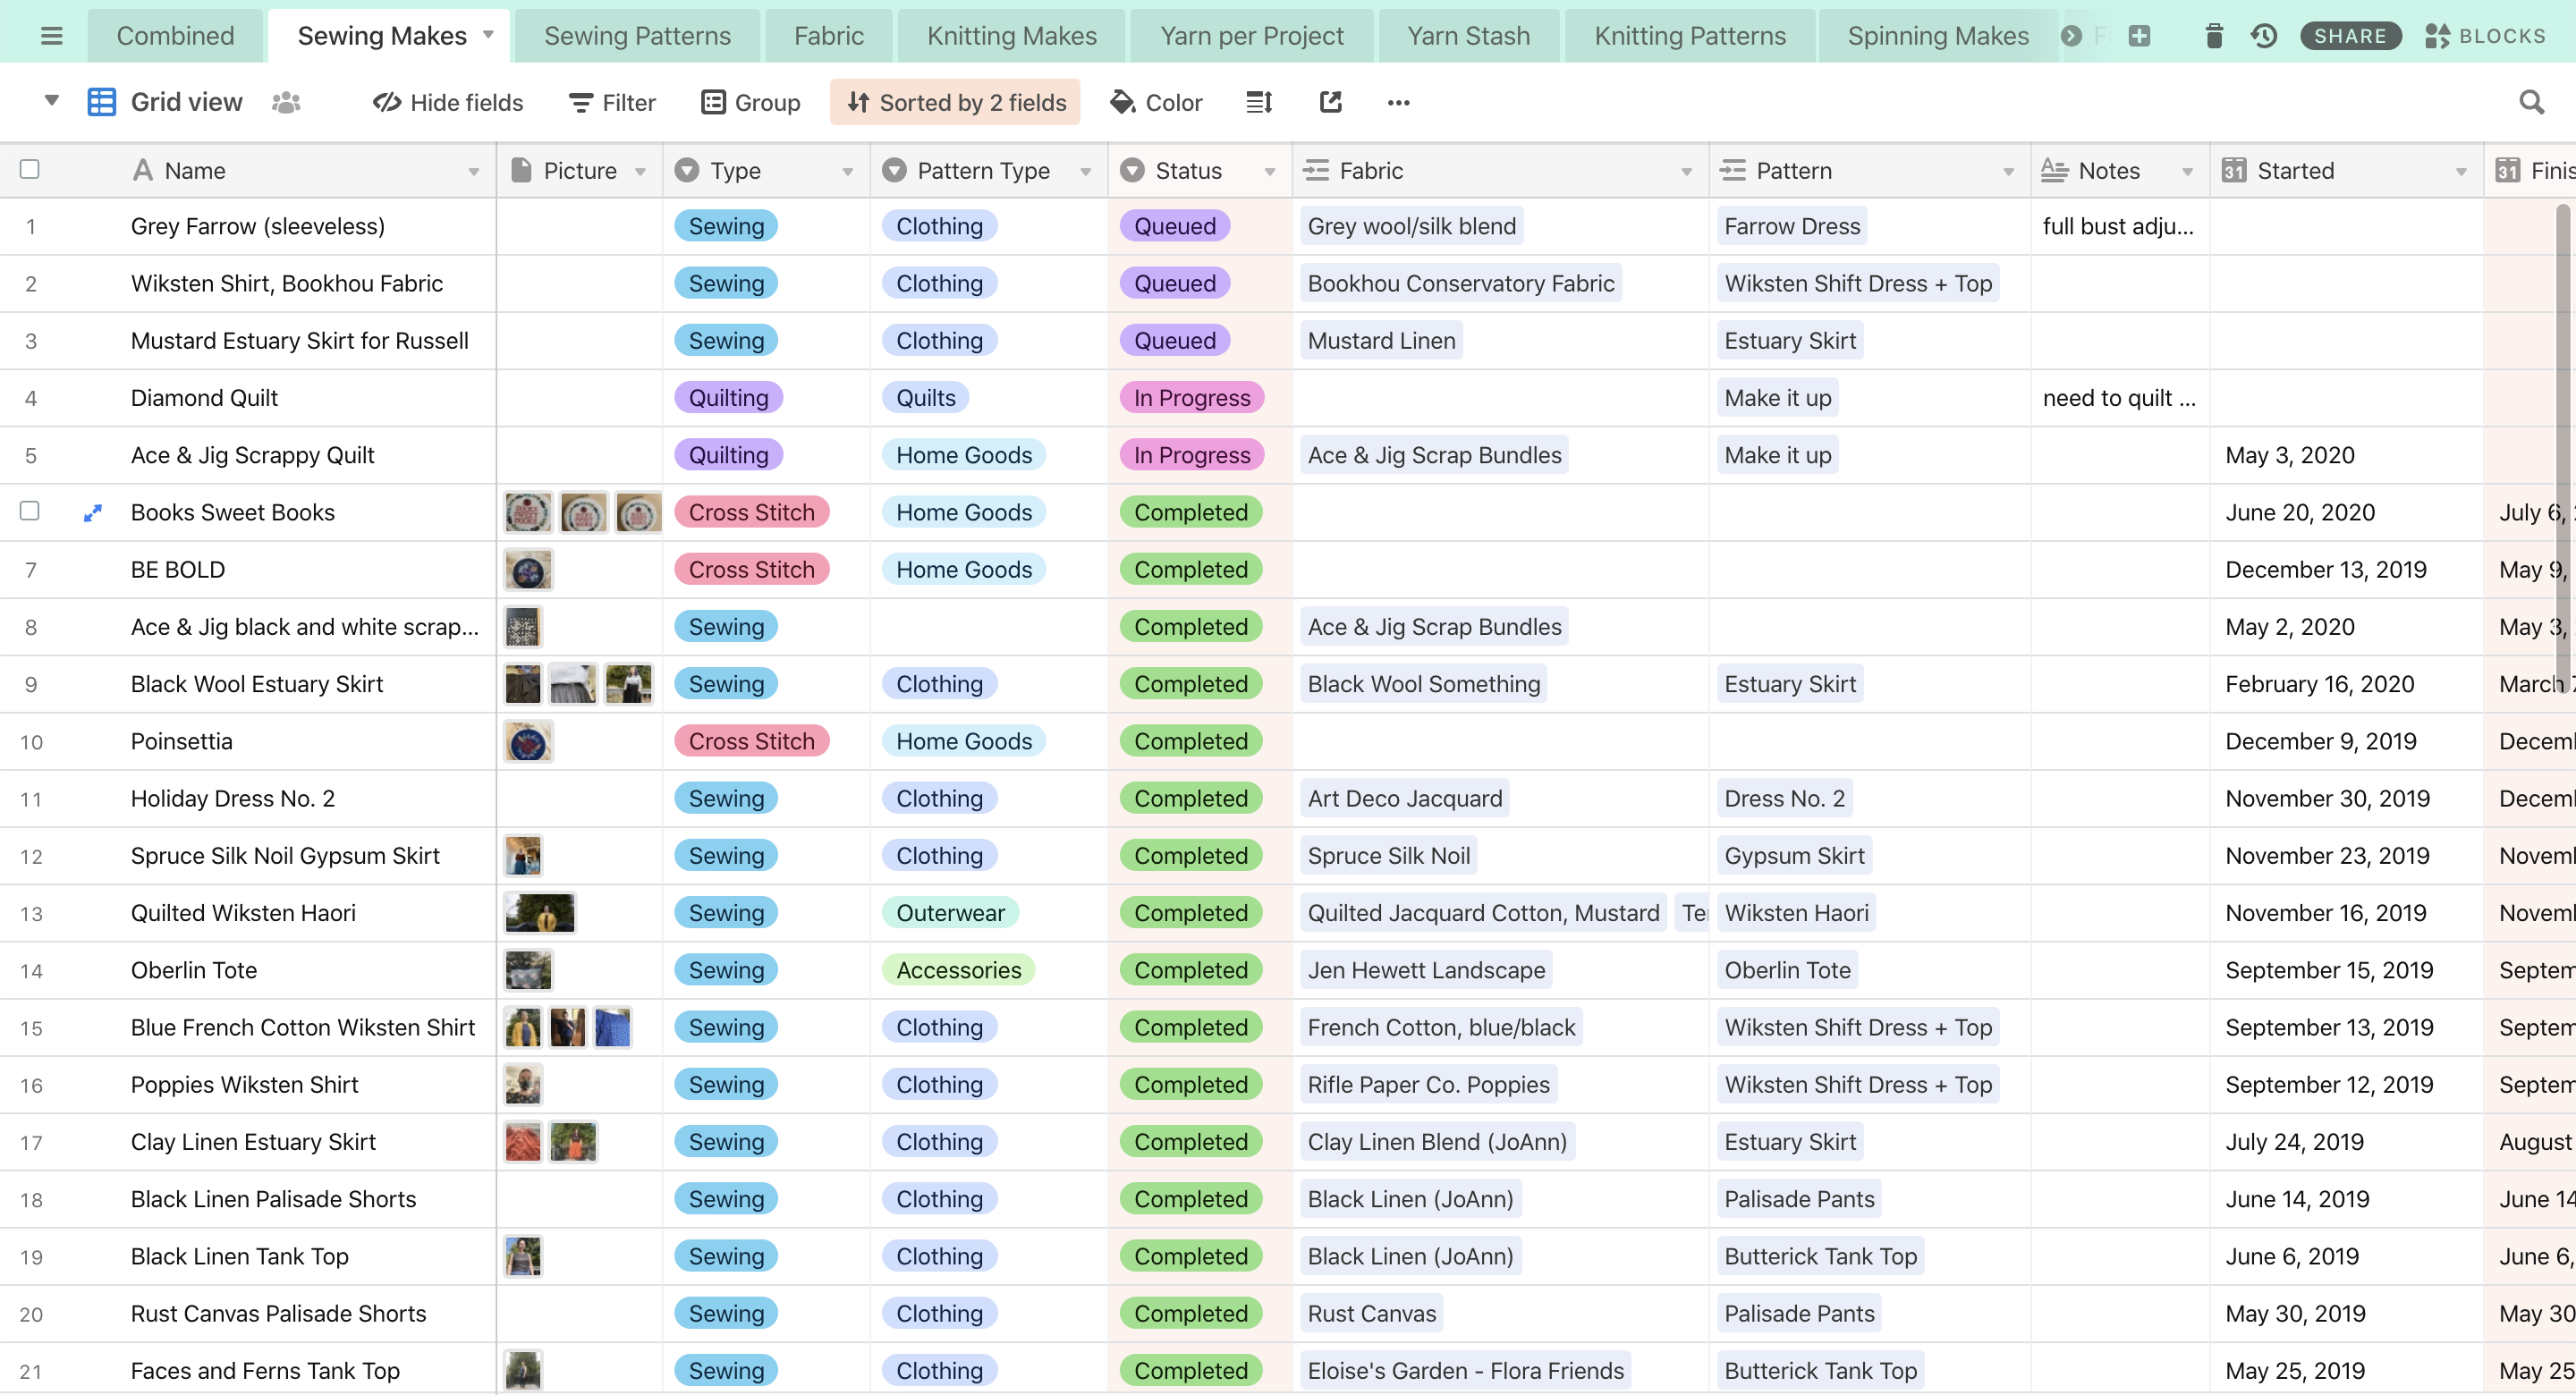
There are three tabs in the Sewing section — Sewing Makes, Sewing Patterns, and Fabric. Sewing Makes is where I keep track of my projects, Patterns where I track the patterns I use or want to use, and then Fabric to store all the info about the fabric I have. In Sewing Makes, I link to both the project and fabric I used.
Sewing Makes
-
Status (single select)
I use the following: Planning, Queued, In Progress, and Completed. I switch a project from Planning to Queued when I have the materials and pattern picked out and am ready to start it, but you may have a different way you think about that separation. -
Fabric (links to Fabric Stash tab)
This pulls in the fabric name (and associated information) from the Fabric Stash tab, and can link to multiple records if I used different fabrics in this project. -
Pattern (links to Sewing Patterns tab)
This pulls in the pattern name (and associated information) and usually links to only one sewing pattern, unless I’ve decided to combine 2+ patterns into the project I’m making. -
Combined (links to the Combined view)
I’ll explain about the Combined view below.
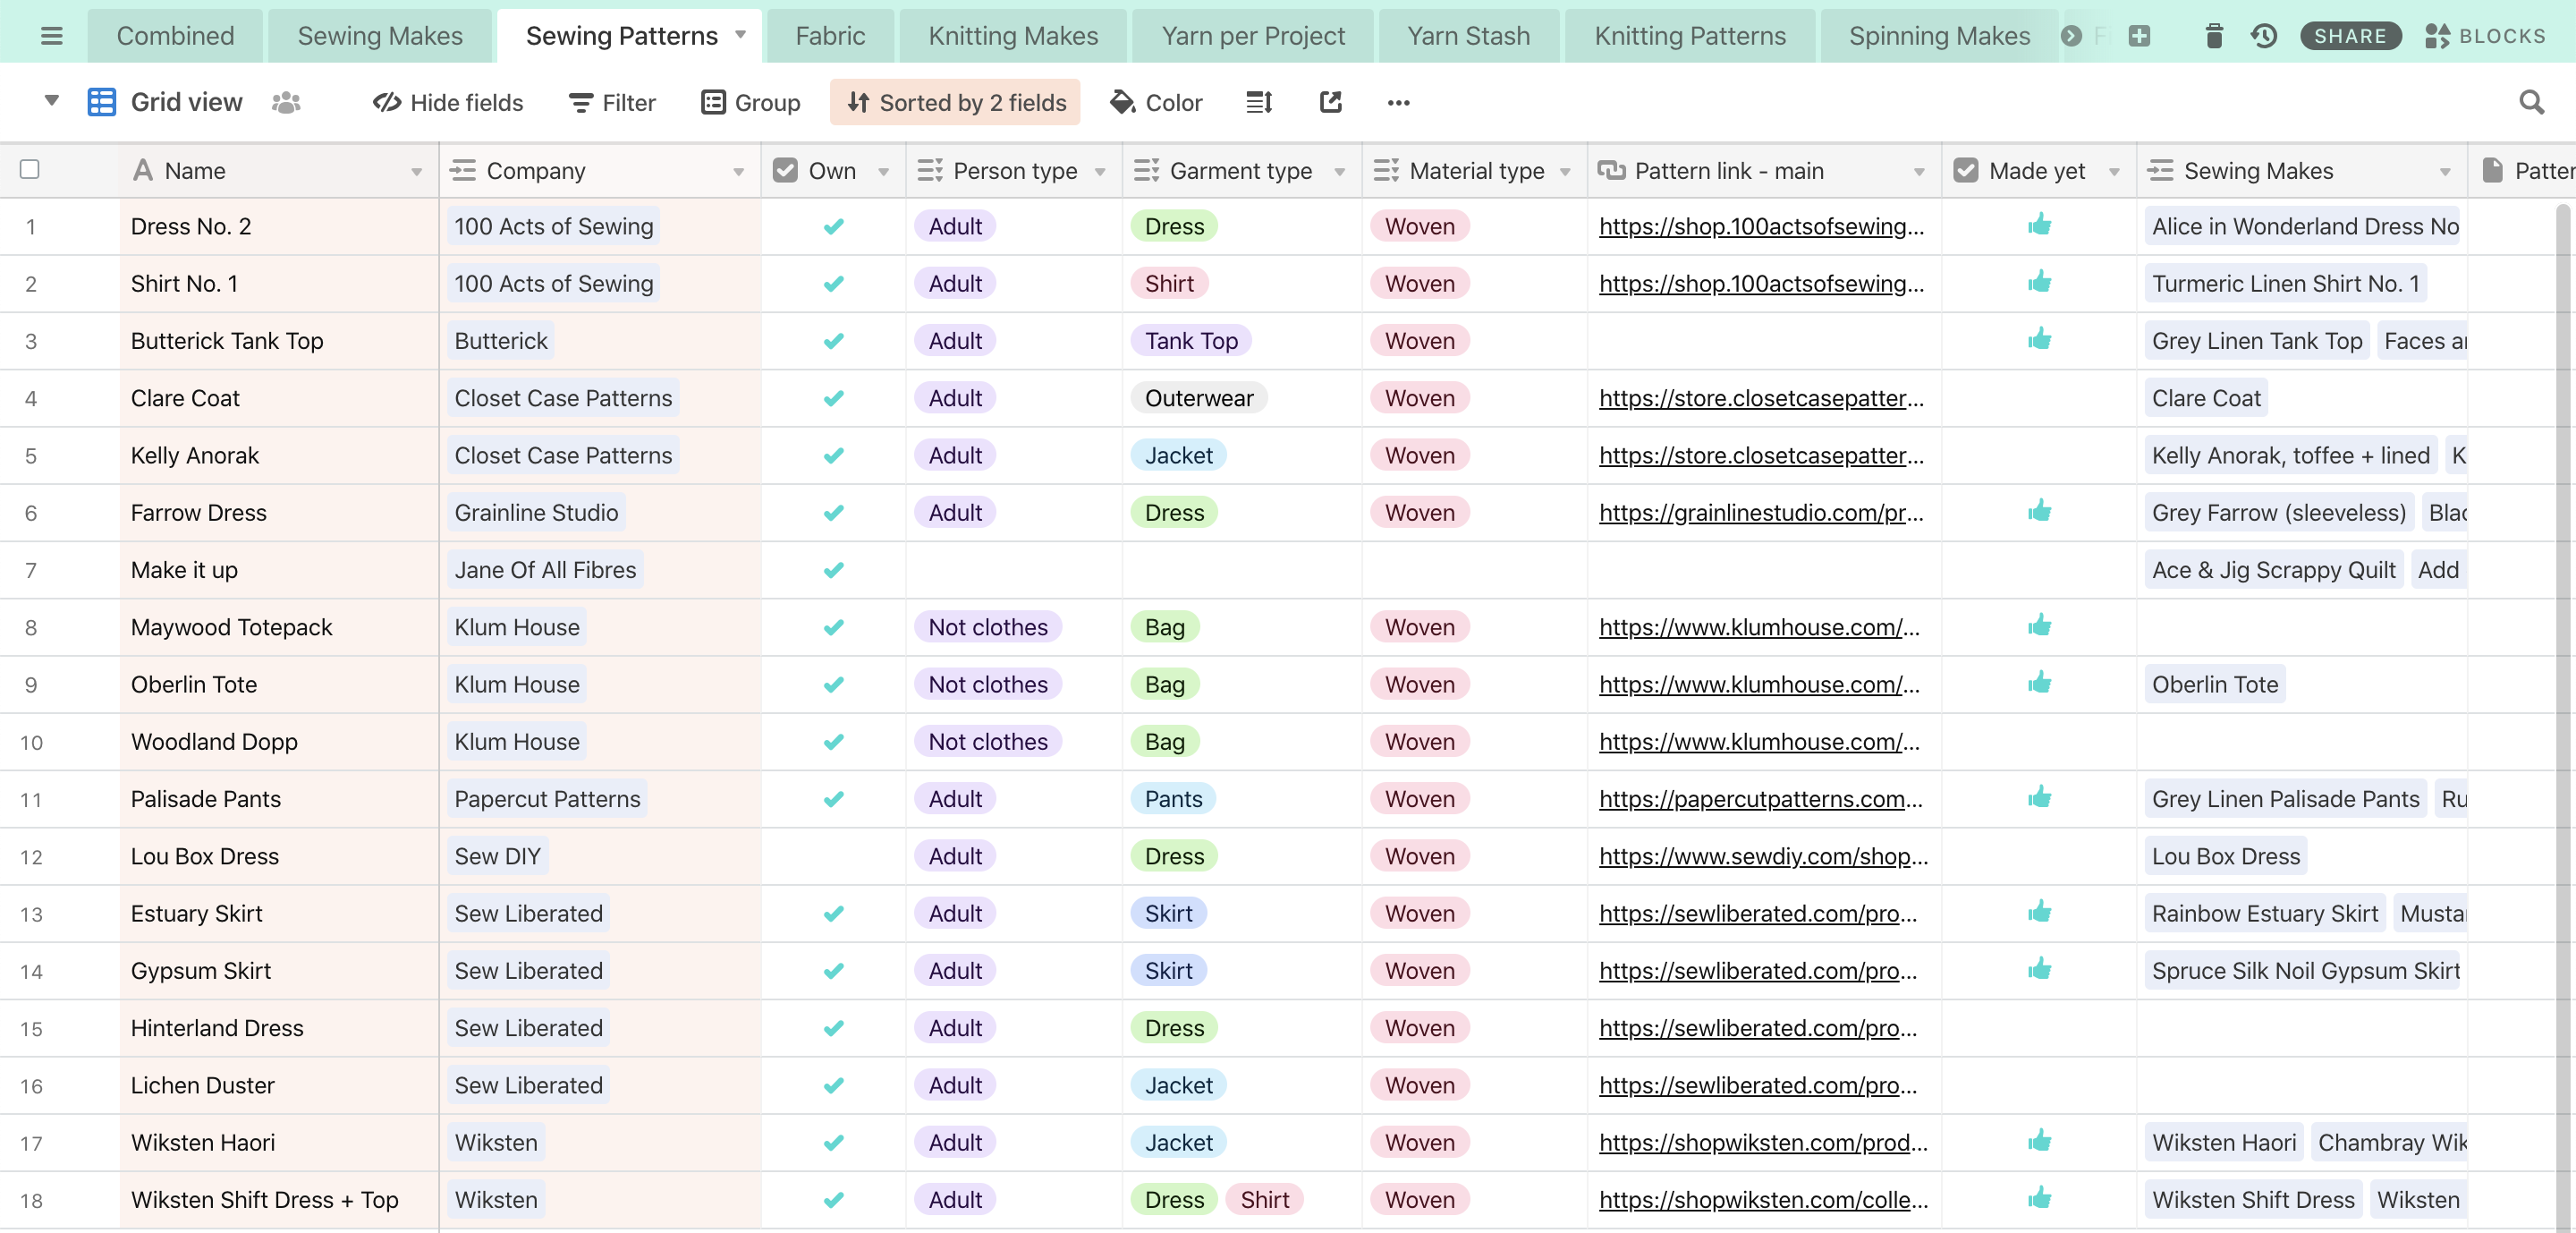
Sewing Patterns
-
Company (link to Pattern Makers tab)
This pulls in the maker’s name and associated information. There’s more information on how I set up the Pattern Makers tab below. -
Sewing Makes (links to the Sewing Makes tab)
If I’ve already linked my sewing project to a specific pattern, it’ll show up here automatically. -
Size Range: (multi-select)
I added this as a multi-select because I wanted to be able to filter more easily on patterns that have an inclusive size range. I think someday I’ll color-code these options so they’re easier to scan, but I haven’t done that yet.
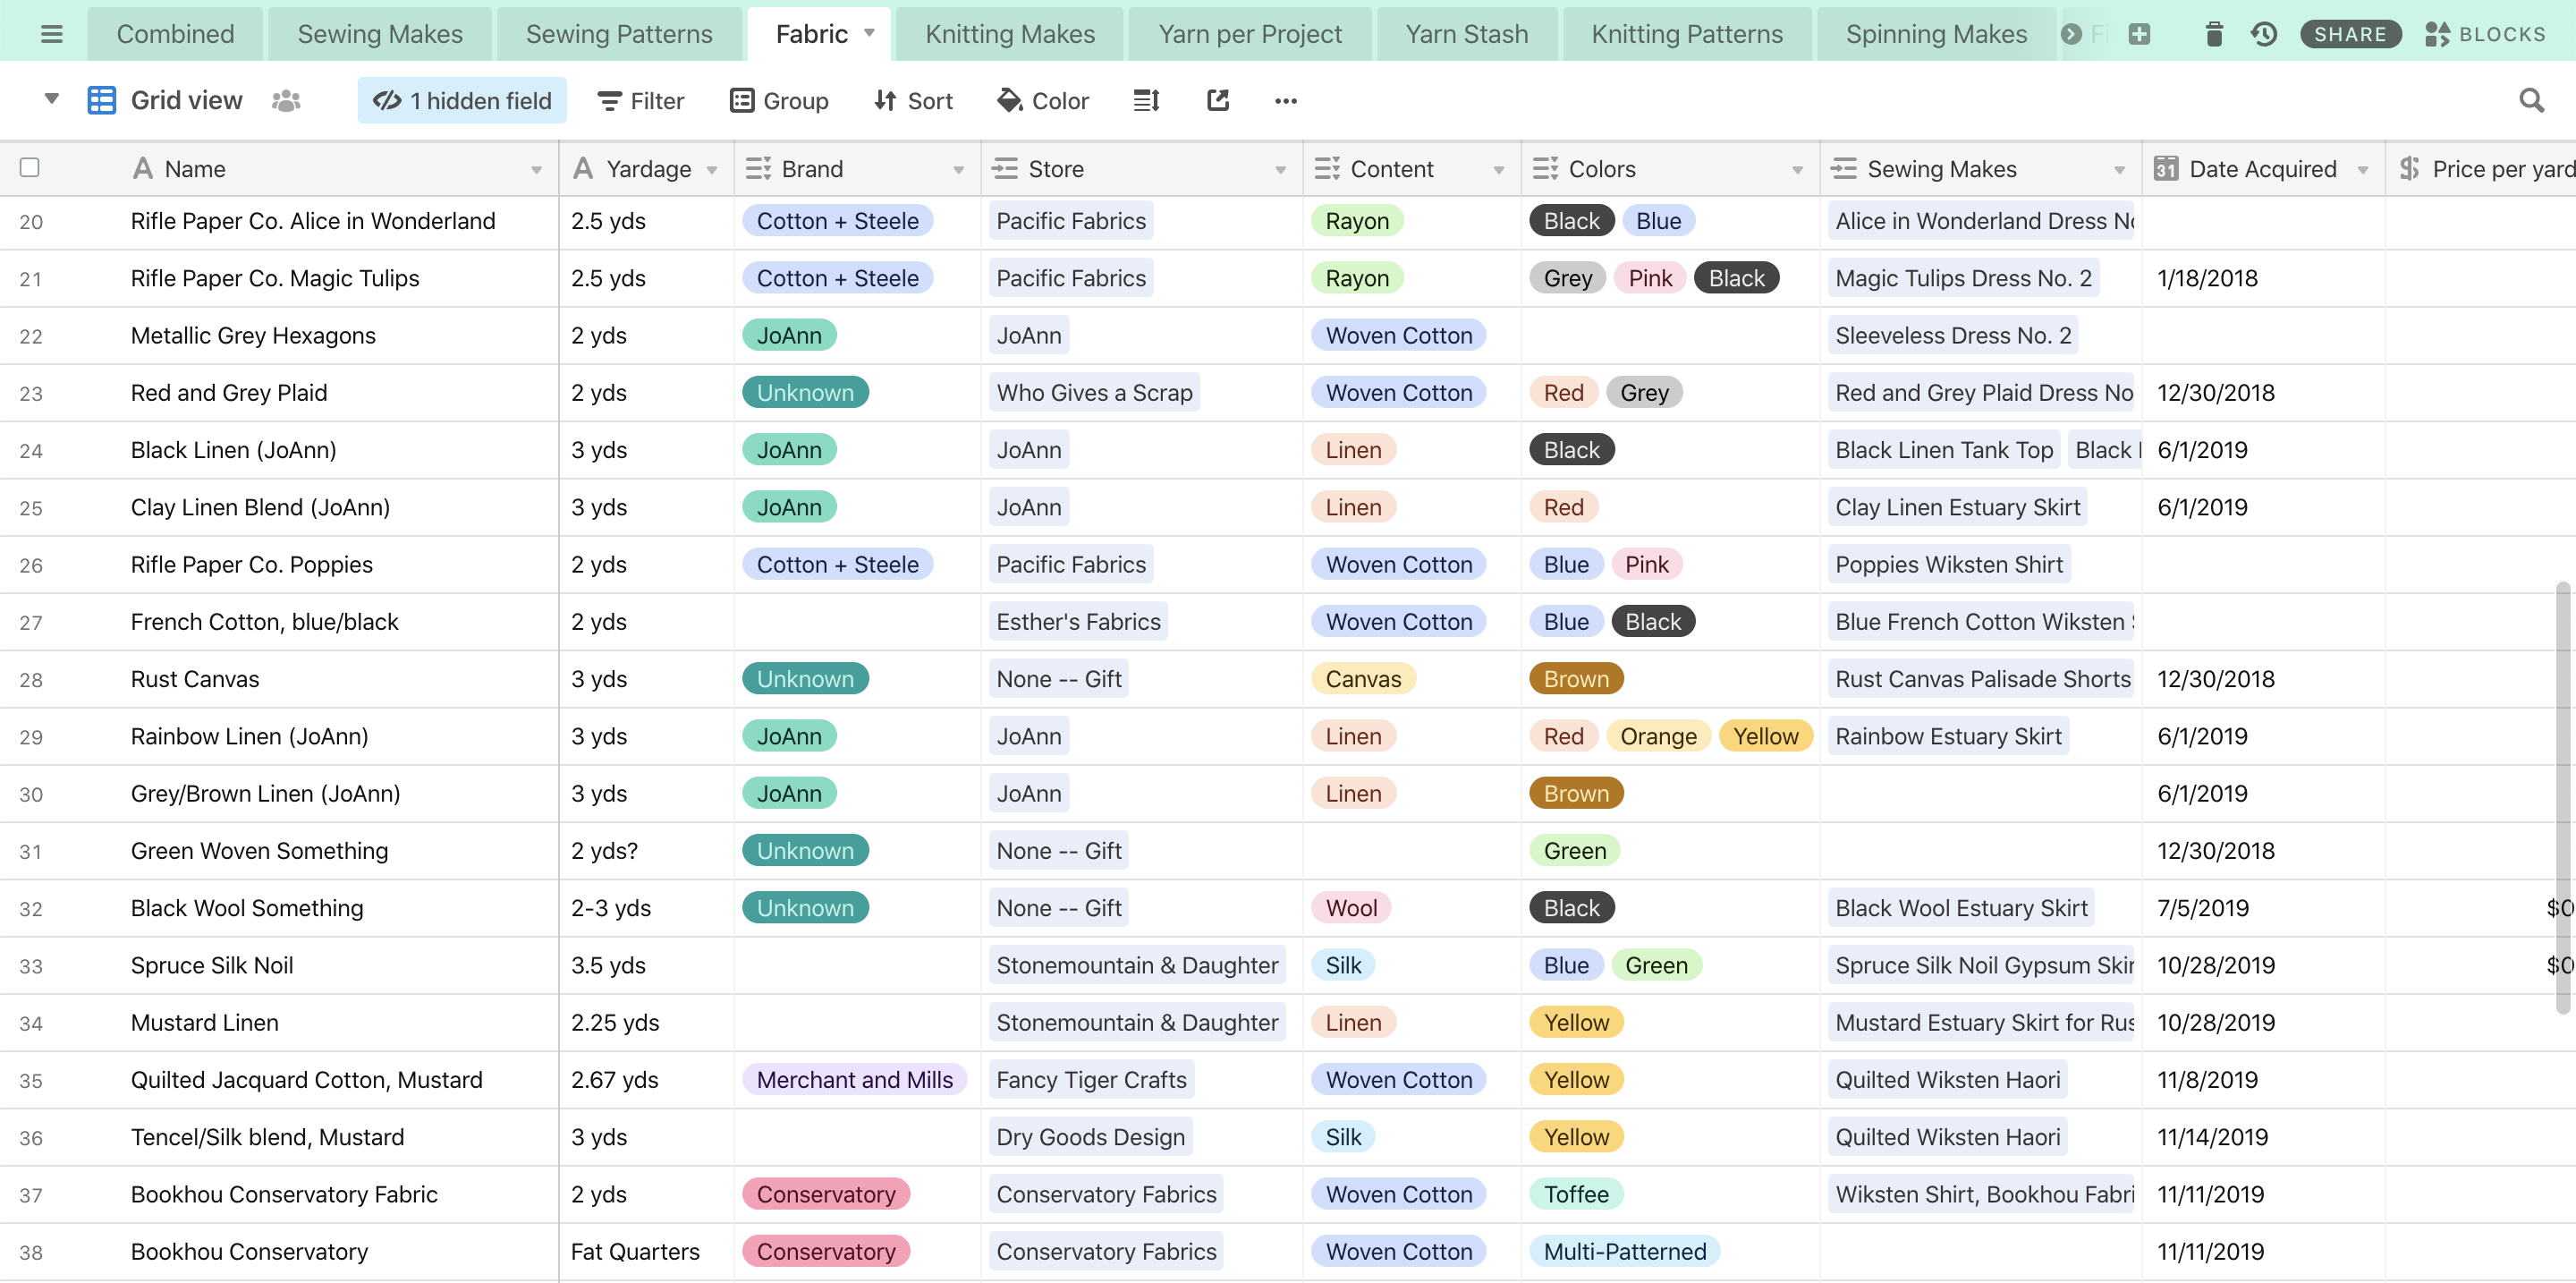
Fabric
-
Yardage (text field)
While I can’t do math this way, I can identify yardage, fat quarters, scrap bundles, and other “amounts” of fabric, which for me is more useful. -
Brand (single select)
You’ll notice in this example I have a lot of blanks and a lot of “unknown”s. Most of this is because I haven’t made the time to go through and figure out the brands for my fabric stash, and others are because I got fabric as a gift or from a thrift store. -
Store (links to Yarn and Fabric Stores tab)
This links to the store name, which I explain a bit more about below. -
Content (multi-select)
This is a multi-select so that I can choose several options for a wool/silk blend, for instance, or so I can clarify when something has a different material in it. This is similar to the setup for yarn, but as you’ll see below I added percentages to my yarn stash, where I haven’t done that here. -
Sewing Makes (links to the Sewing Makes tab)
If I’ve already linked my sewing project to a specific piece of fabric, it’ll show up here automatically.
Knitting
This is the most fleshed out section, because I imported a lot of stuff from Ravelry and because I want to keep better track of how much yarn I’ve used in a project so that I can see what I have left over. Unlike the Sewing section, I actually have four tabs here — Knitting Makes, Yarn Per Project, Yarn Stash, and Knitting Patterns. The important step for being able to calculate yardage used in a project and remaining yardage in my stash is the middle-step of the Yarn Per Project tab between the knitting project and the full skeins in my stash: this makes a record for the yarn (amount) that I’ve specifically used for this project, and then does calculations based on the yardage I used to tell me how much I have left in my stash. So here, I link to Knitting Patterns and Yarn Per Project in the Knitting Makes tab, and then link to my Yarn Stash through the Yarn Per Project tab. What’s awesome about Airtable is that once you’ve linked one record (tab) to another, you can also pull in information automatically, which means you don’t have to repeat the information you’ve already collected in the other tabs. So if I wanted, I could pull information about the yarn in my stash into either the Yarn Per Project or the Knitting Makes tab, but would only need to update that information in one place.
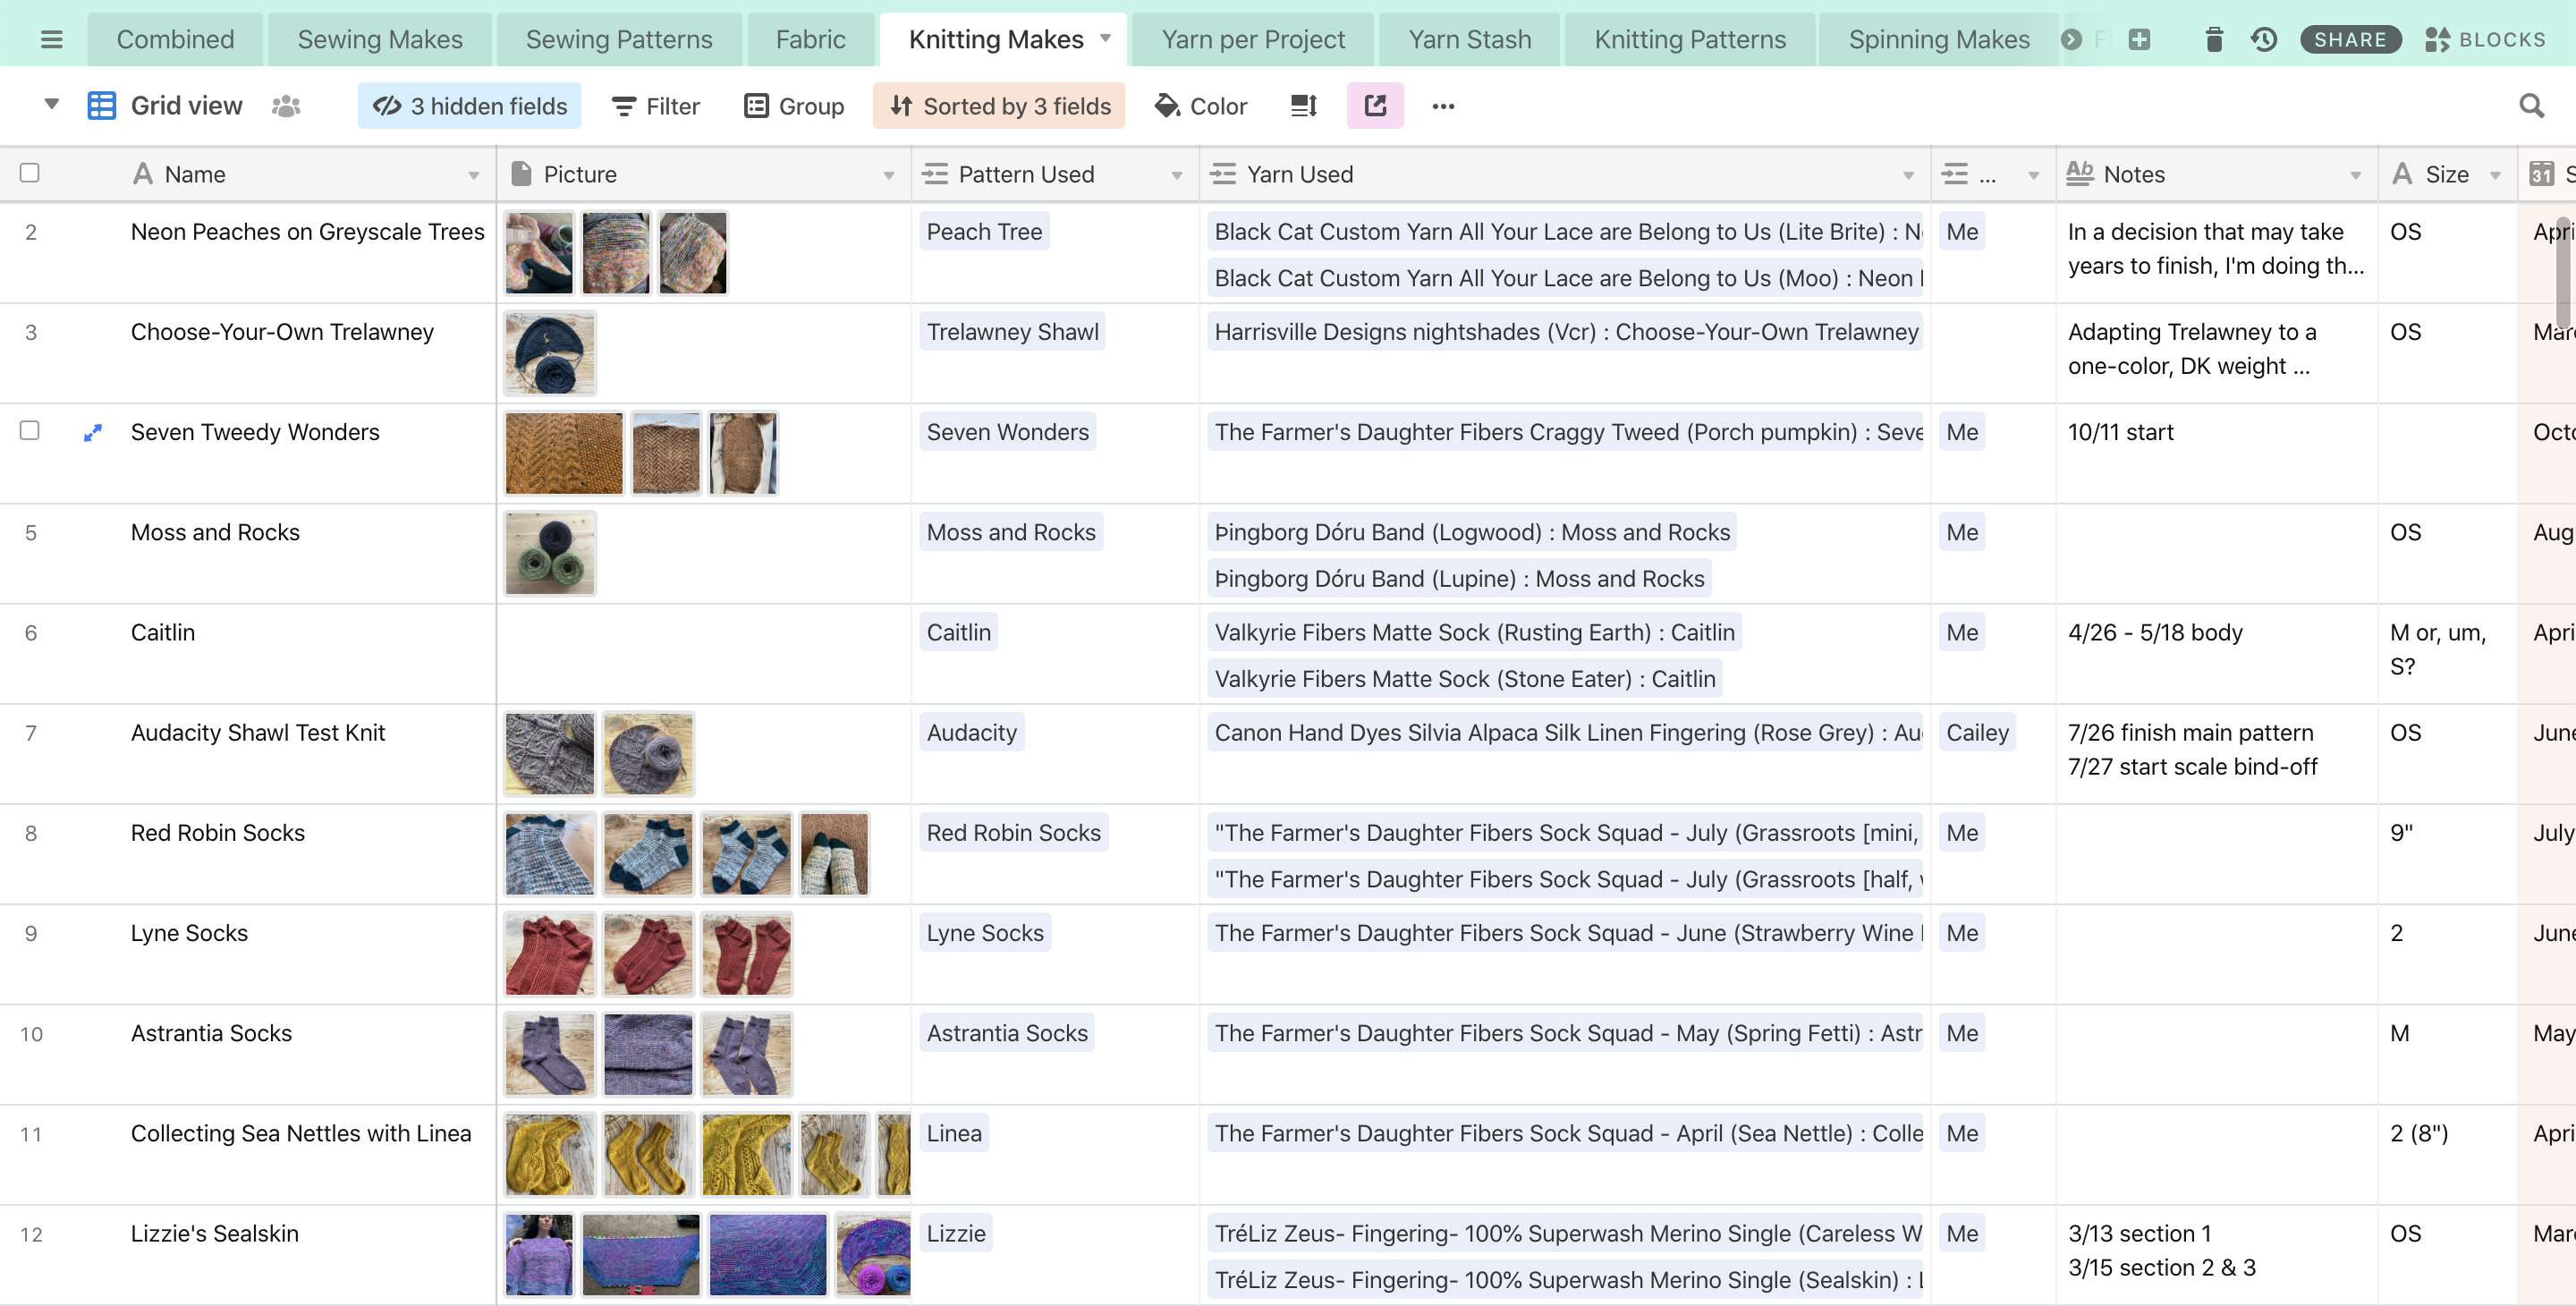
Knitting Makes
-
Pattern Used (links to Knitting Patterns tab)
-
Yarn Used (links to Yarn Per Project tab)
-
Status (single select)
I use the same options as I do in the Sewing Makes tab: Planning, Queued, In Progress, and Completed. -
Needles Used (multi-select)
I considered linking this to my Needles Inventory, but decided against it because what I wanted to keep track of here was just the size used, not necessarily the specific needles I used. I might change my mind later. -
Tags (multi-select)
This is a holdover from Ravelry, and while I used it occasionally there, I feel like I might use it more often here. -
Total Yards (calculation from Yarn Per Project tab)
This is one of the things I spent a lot of time figuring, because I really appreciate this about Ravelry, and wanted to be able to do something similar in whatever I came up with. This takes the sum of the yardage from all the yarn records I’m using in a project and adds them up, so I can see my total yardage per project. -
Combined (links to the Combined view)
I’ll explain this more below.
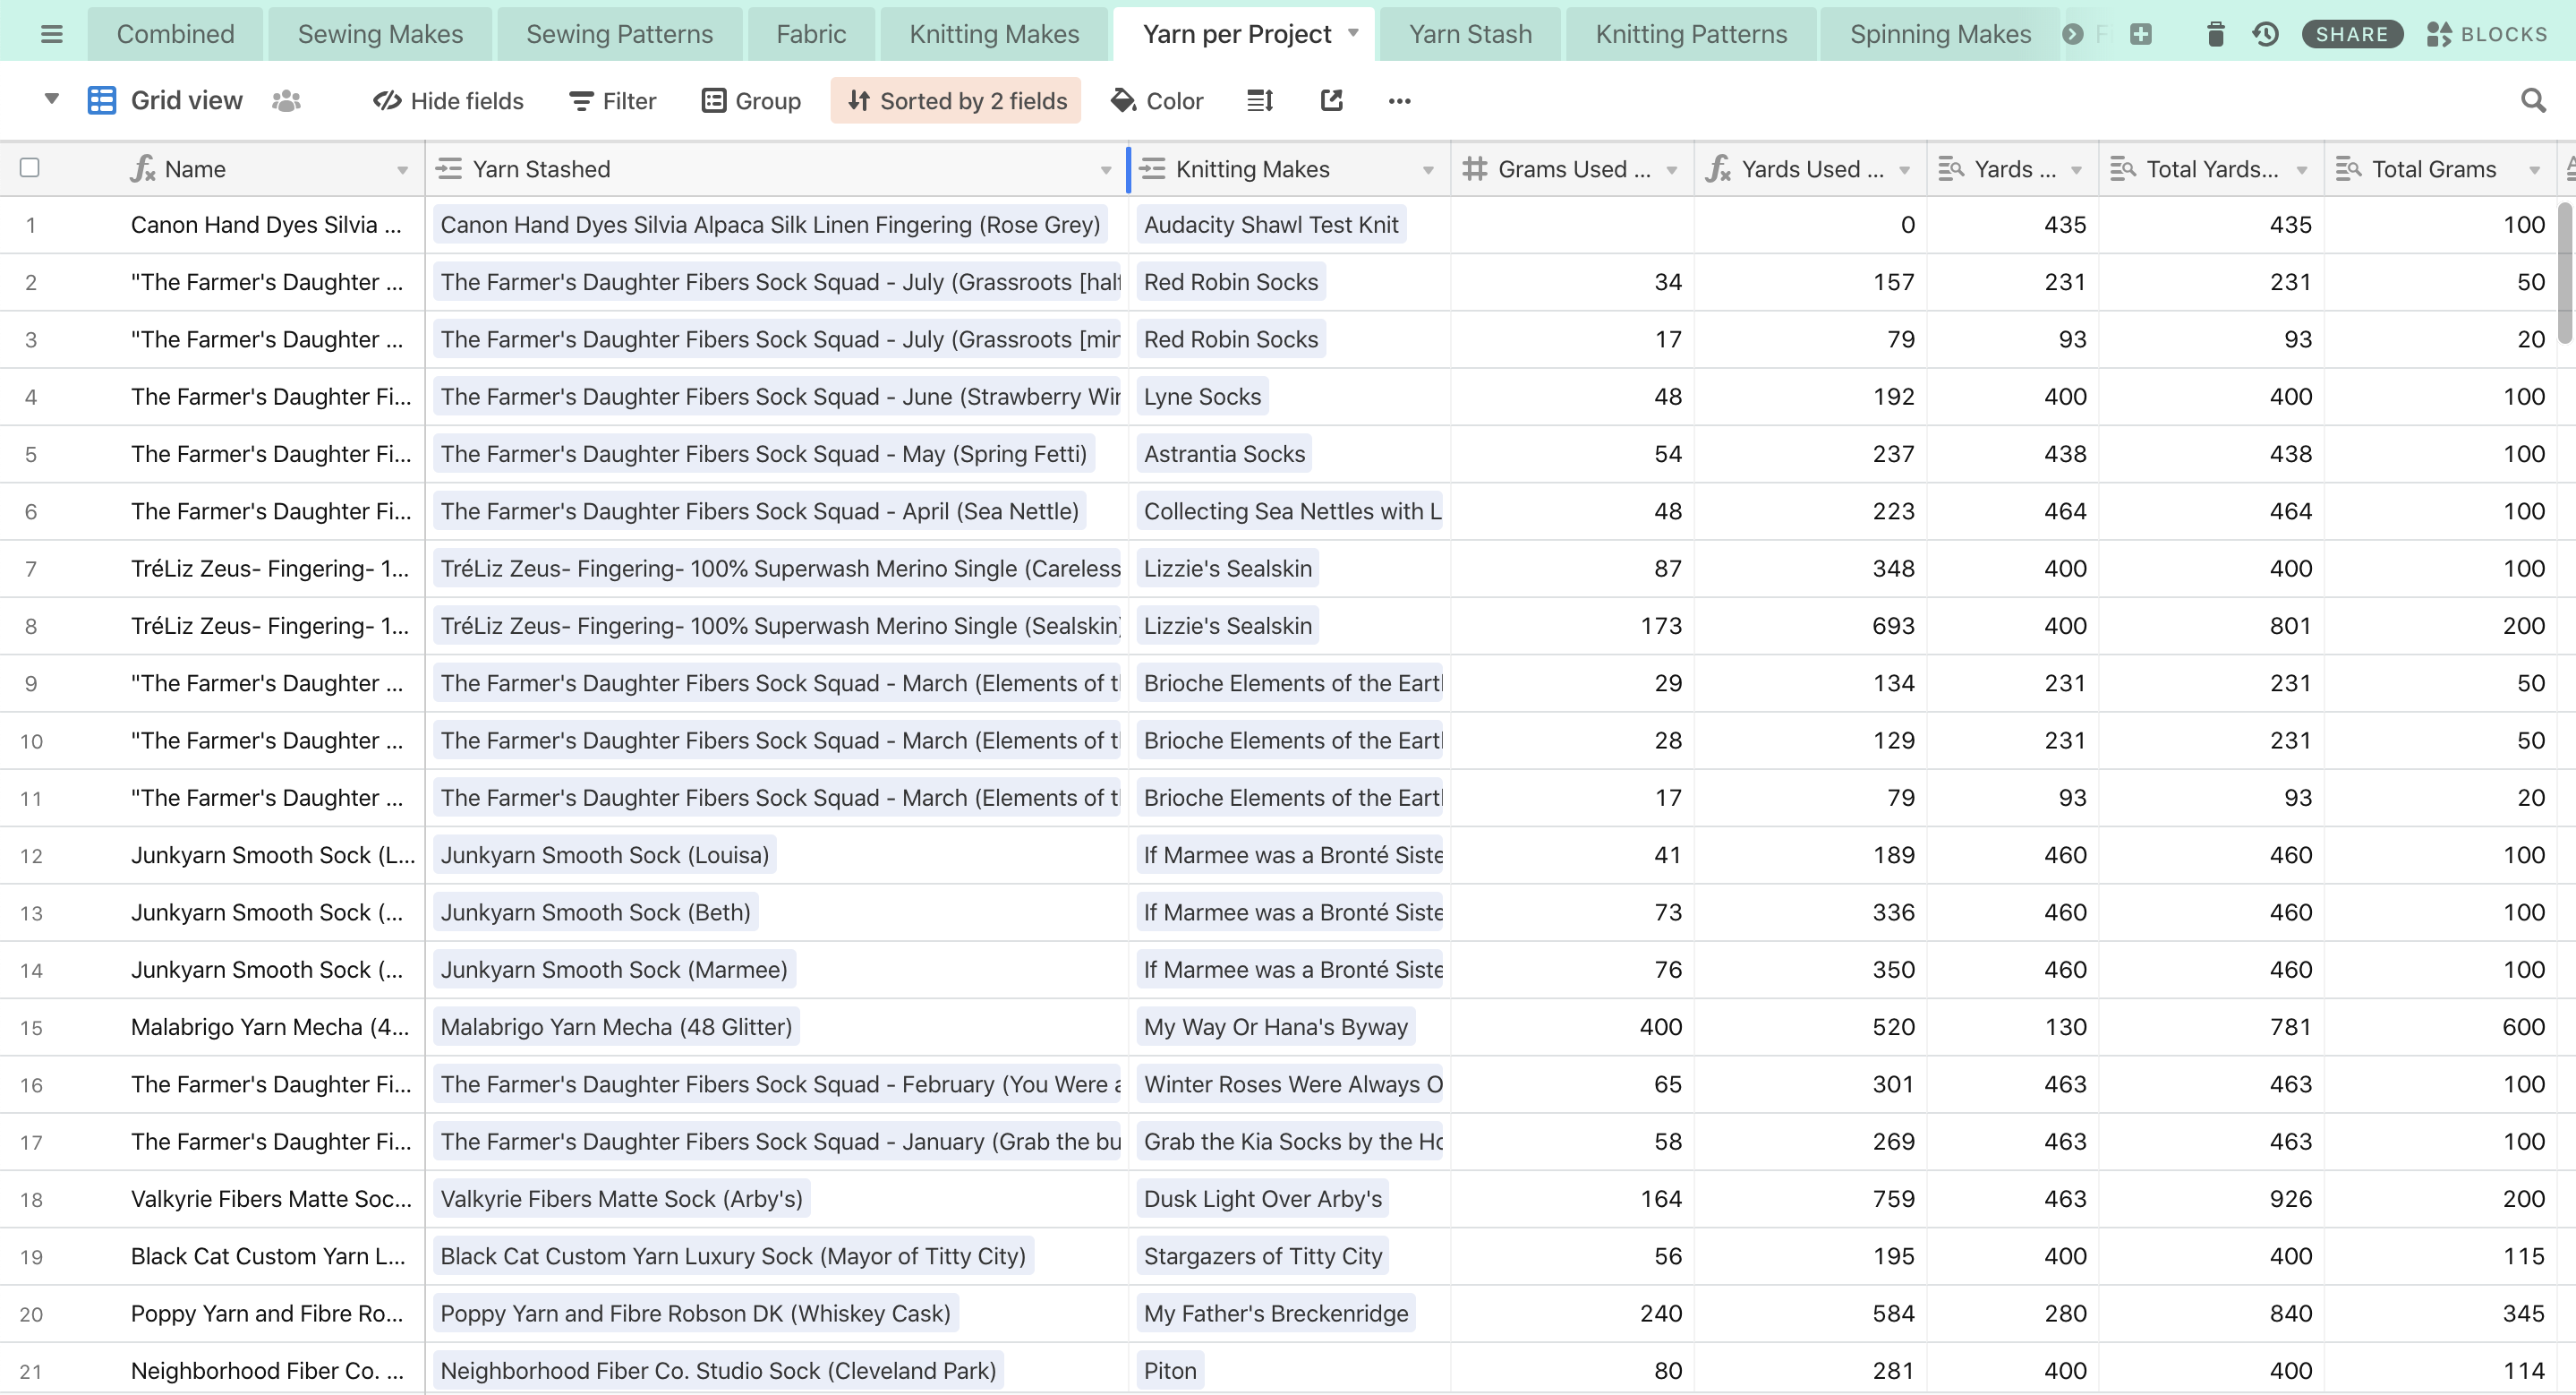
Yarn Per Project
-
Name (formula combining Stashed Yarn Name + Knitting Make)
I made this a formula because since it’s really a middle-step between the knitting project and the yarn, I don’t necessarily need to make up anything fancy for the name. So the most important pieces of information — what I’m making and what I’m using — are in there for me to search for easily. -
Yarn Stashed (links to Yarn Stash)
This links to the record for the full skein of yarn I’m using. If I only use part of it, I’ll keep track of how much I did use for this project on this tab, which I can then use in calculations later. -
Knitting Makes (links to Knitting Makes)
This links to my knitting project, and while on this end there should only be one record for each yarn type/colorway, on the Knitting Makes side I can link to multiple records (if I’m using multiple yarns or colors). -
Grams Used (number)
This field is very important because it’s what all of the yarn used calculations are based on. -
Yards Used (formula based on total yardage & grams used)
-
Lookup Fields:
-
Yards Per Skein (lookup from Yarn Stash)
-
Total Yards (lookup from Yarn Stash)
-
Total Grams (lookup from Yarn Stash)
-
Project Finish (lookup from Knitting Makes)
-
Project Start (lookup from Knitting Makes)
These lookup fields are important because they make the math work. Luckily, since I already set this up, you can pretty much ignore these fields, unless you want to change the formula.
-
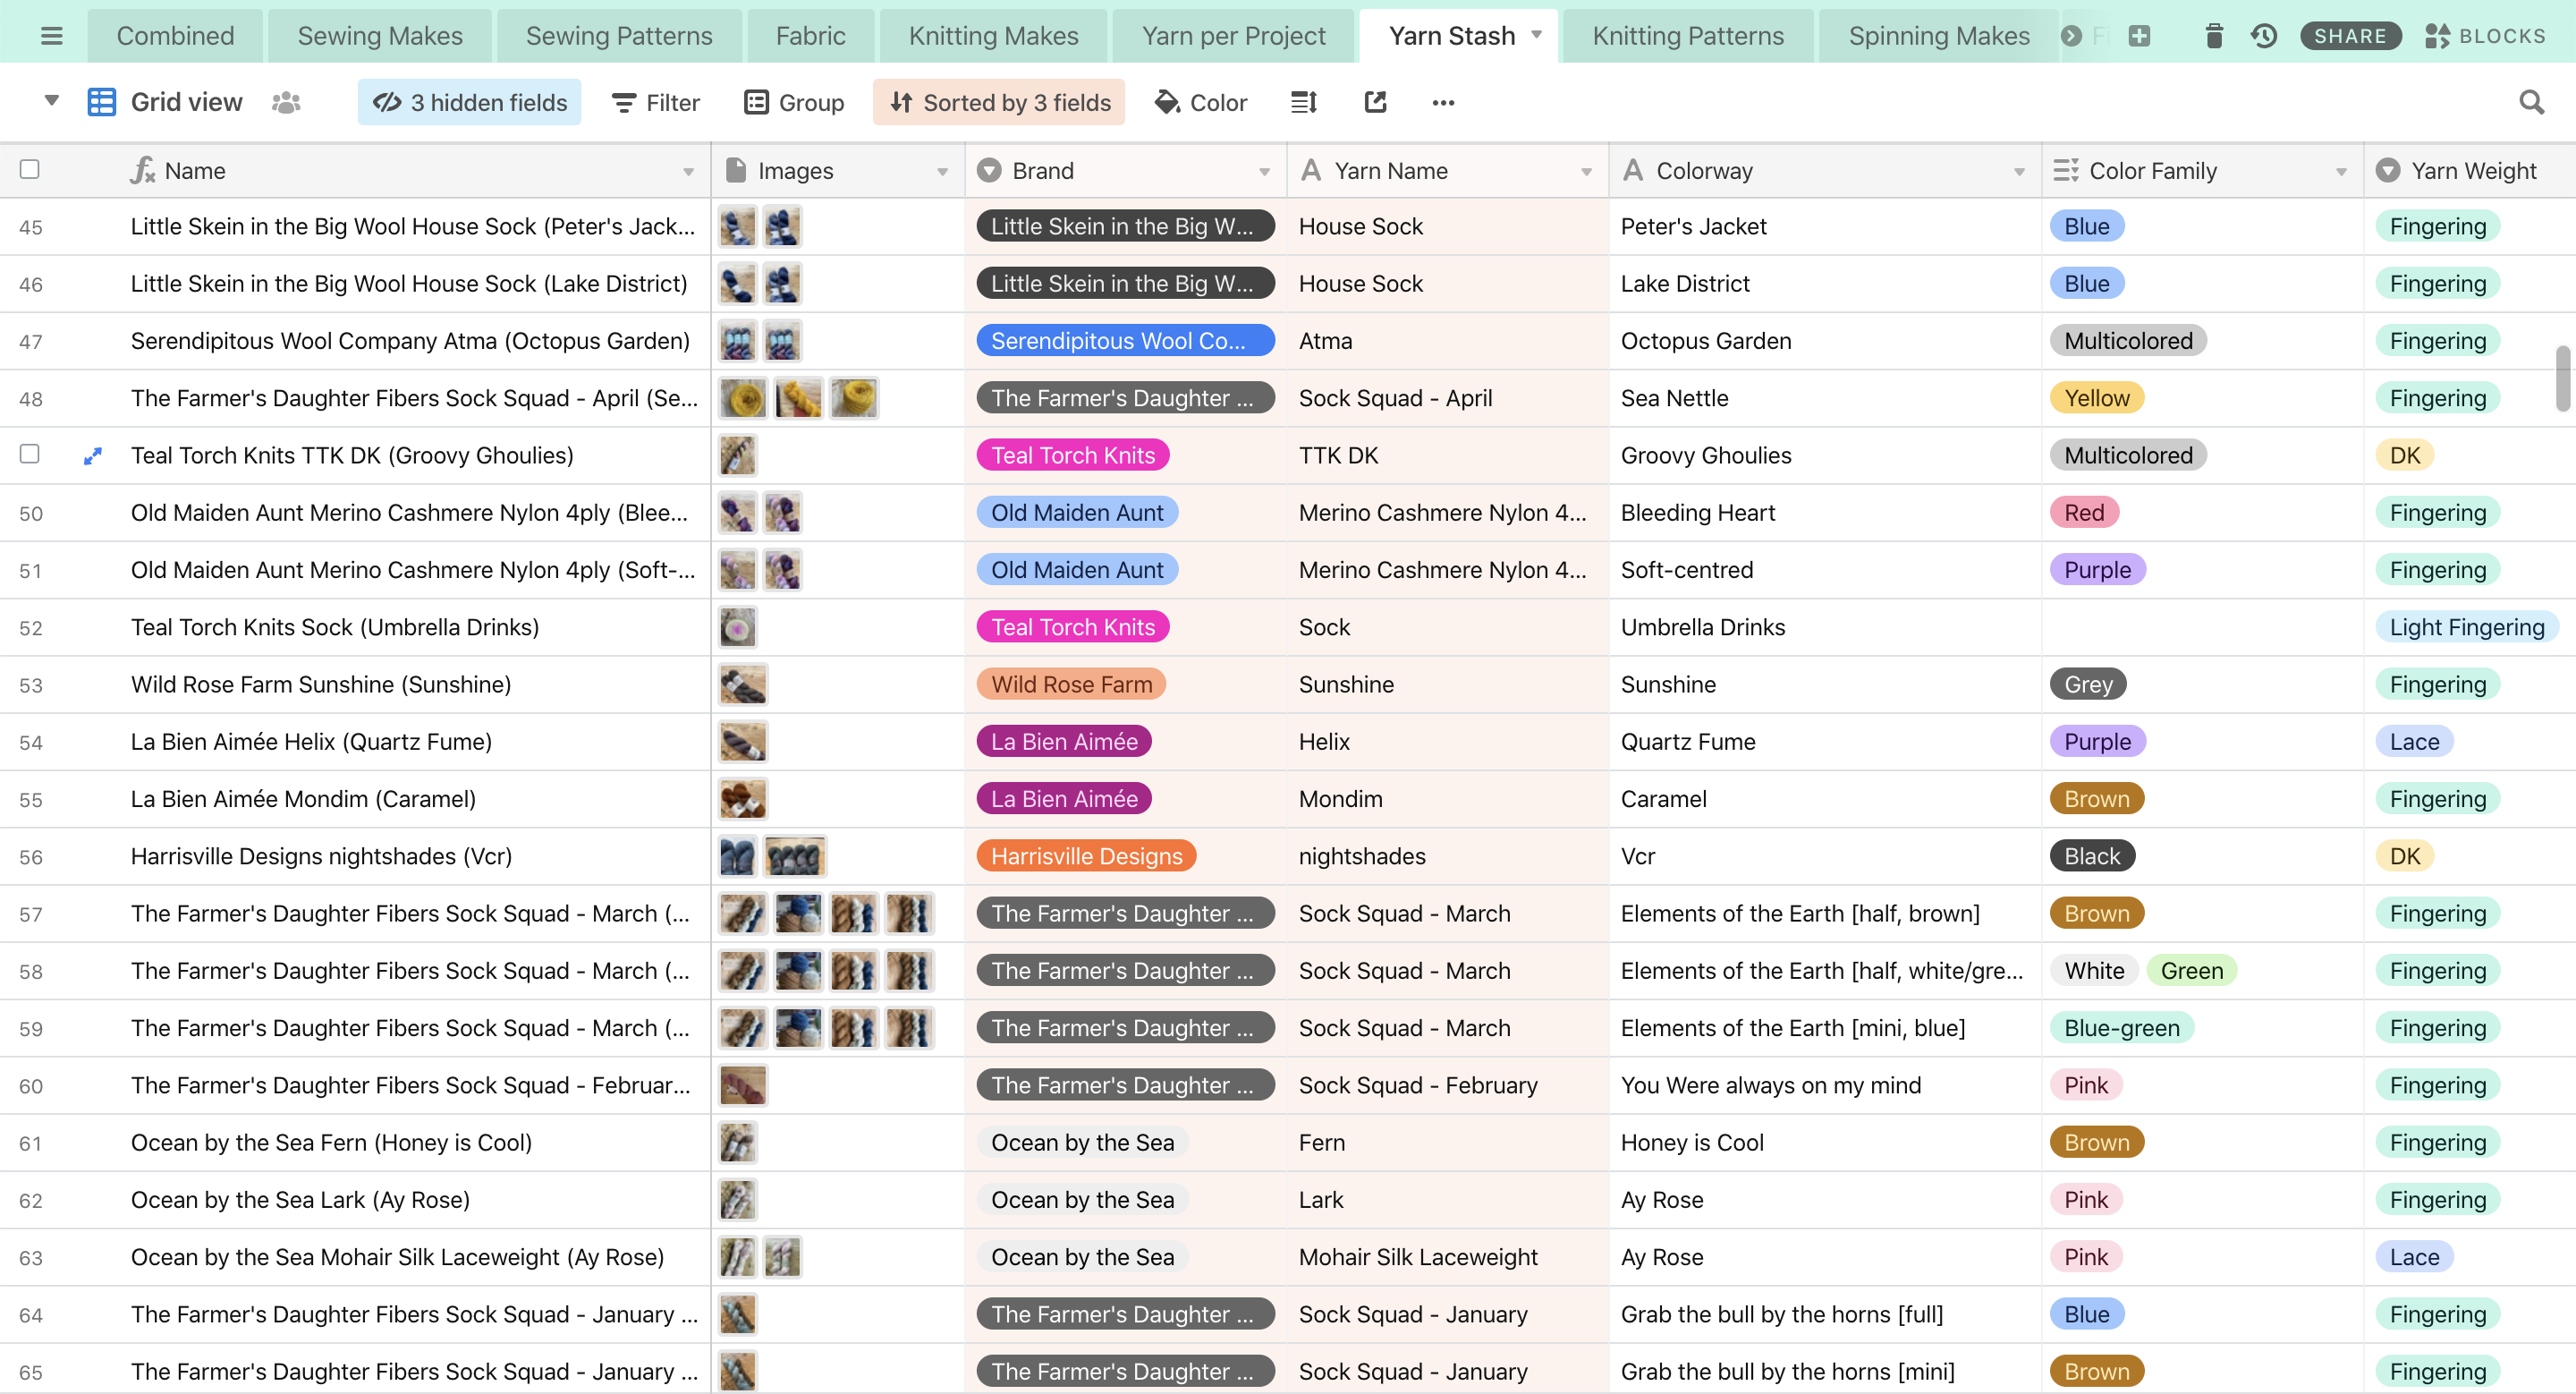
Yarn Stash
-
Name (formula combining Brand, Yarn Name, and Colorway)
Again, this is a formula because I’m already keeping track of all the pieces I would use to identify the particular yarn I want to use — namely the brand and yarn name, but I added colorway in because I have a lot of yarn that’s the same brand/yarn type and is only differentiated by color, and I wanted to be able to see that in the record name. -
Knitting Makes (lookup to Knitting Makes via Yarn Per Project)
This is a lookup field: because my yarn stash isn’t directly linked to my project, when I want to see what projects I used a certain yarn for, I can do that because they’re both linked to the Yarn Per Project tab, and I can pull information in either direction from that tab. -
Yarn per Project (links to Yarn Per Project tab)
This is the active link to the record for yarn used in a particular knitting project. -
Yarn Amount:
-
Grams Per Skein (number)
-
Yards Per Skein (number)
-
Total Skeins (number)
These are important because a) of course you want to know how much yarn you have, and b) they’re used to calculate how much yarn is used per project and, later, how much yarn is remaining in the skein(s).
-
-
Formulas:
-
Total Yards (formula multiplying yards x skeins)
-
Total Grams (formula multiplying grams x skeins)
-
Yards Per Gram (formula calculating yards per gram)
-
Grams Used (sum/rollup of how much of this yarn has been used via Yarn Per Project tab)
-
Remaining Yards (formula calculating remaining yardage based on Yarn Per Project tab and yards per gram)
-
Remaining Grams (formula calculating remaining grams based on grams used in Yarn Per Project)
-
-
Spinning Makes (links to Spinning Makes tab)
This one is only just beginning to be used, and isn’t used all the time — it’s to link my spinning projects to their finished yarn records, so I can then link those yarn records to projects (when I eventually start knitting my handspun).
Knitting Patterns
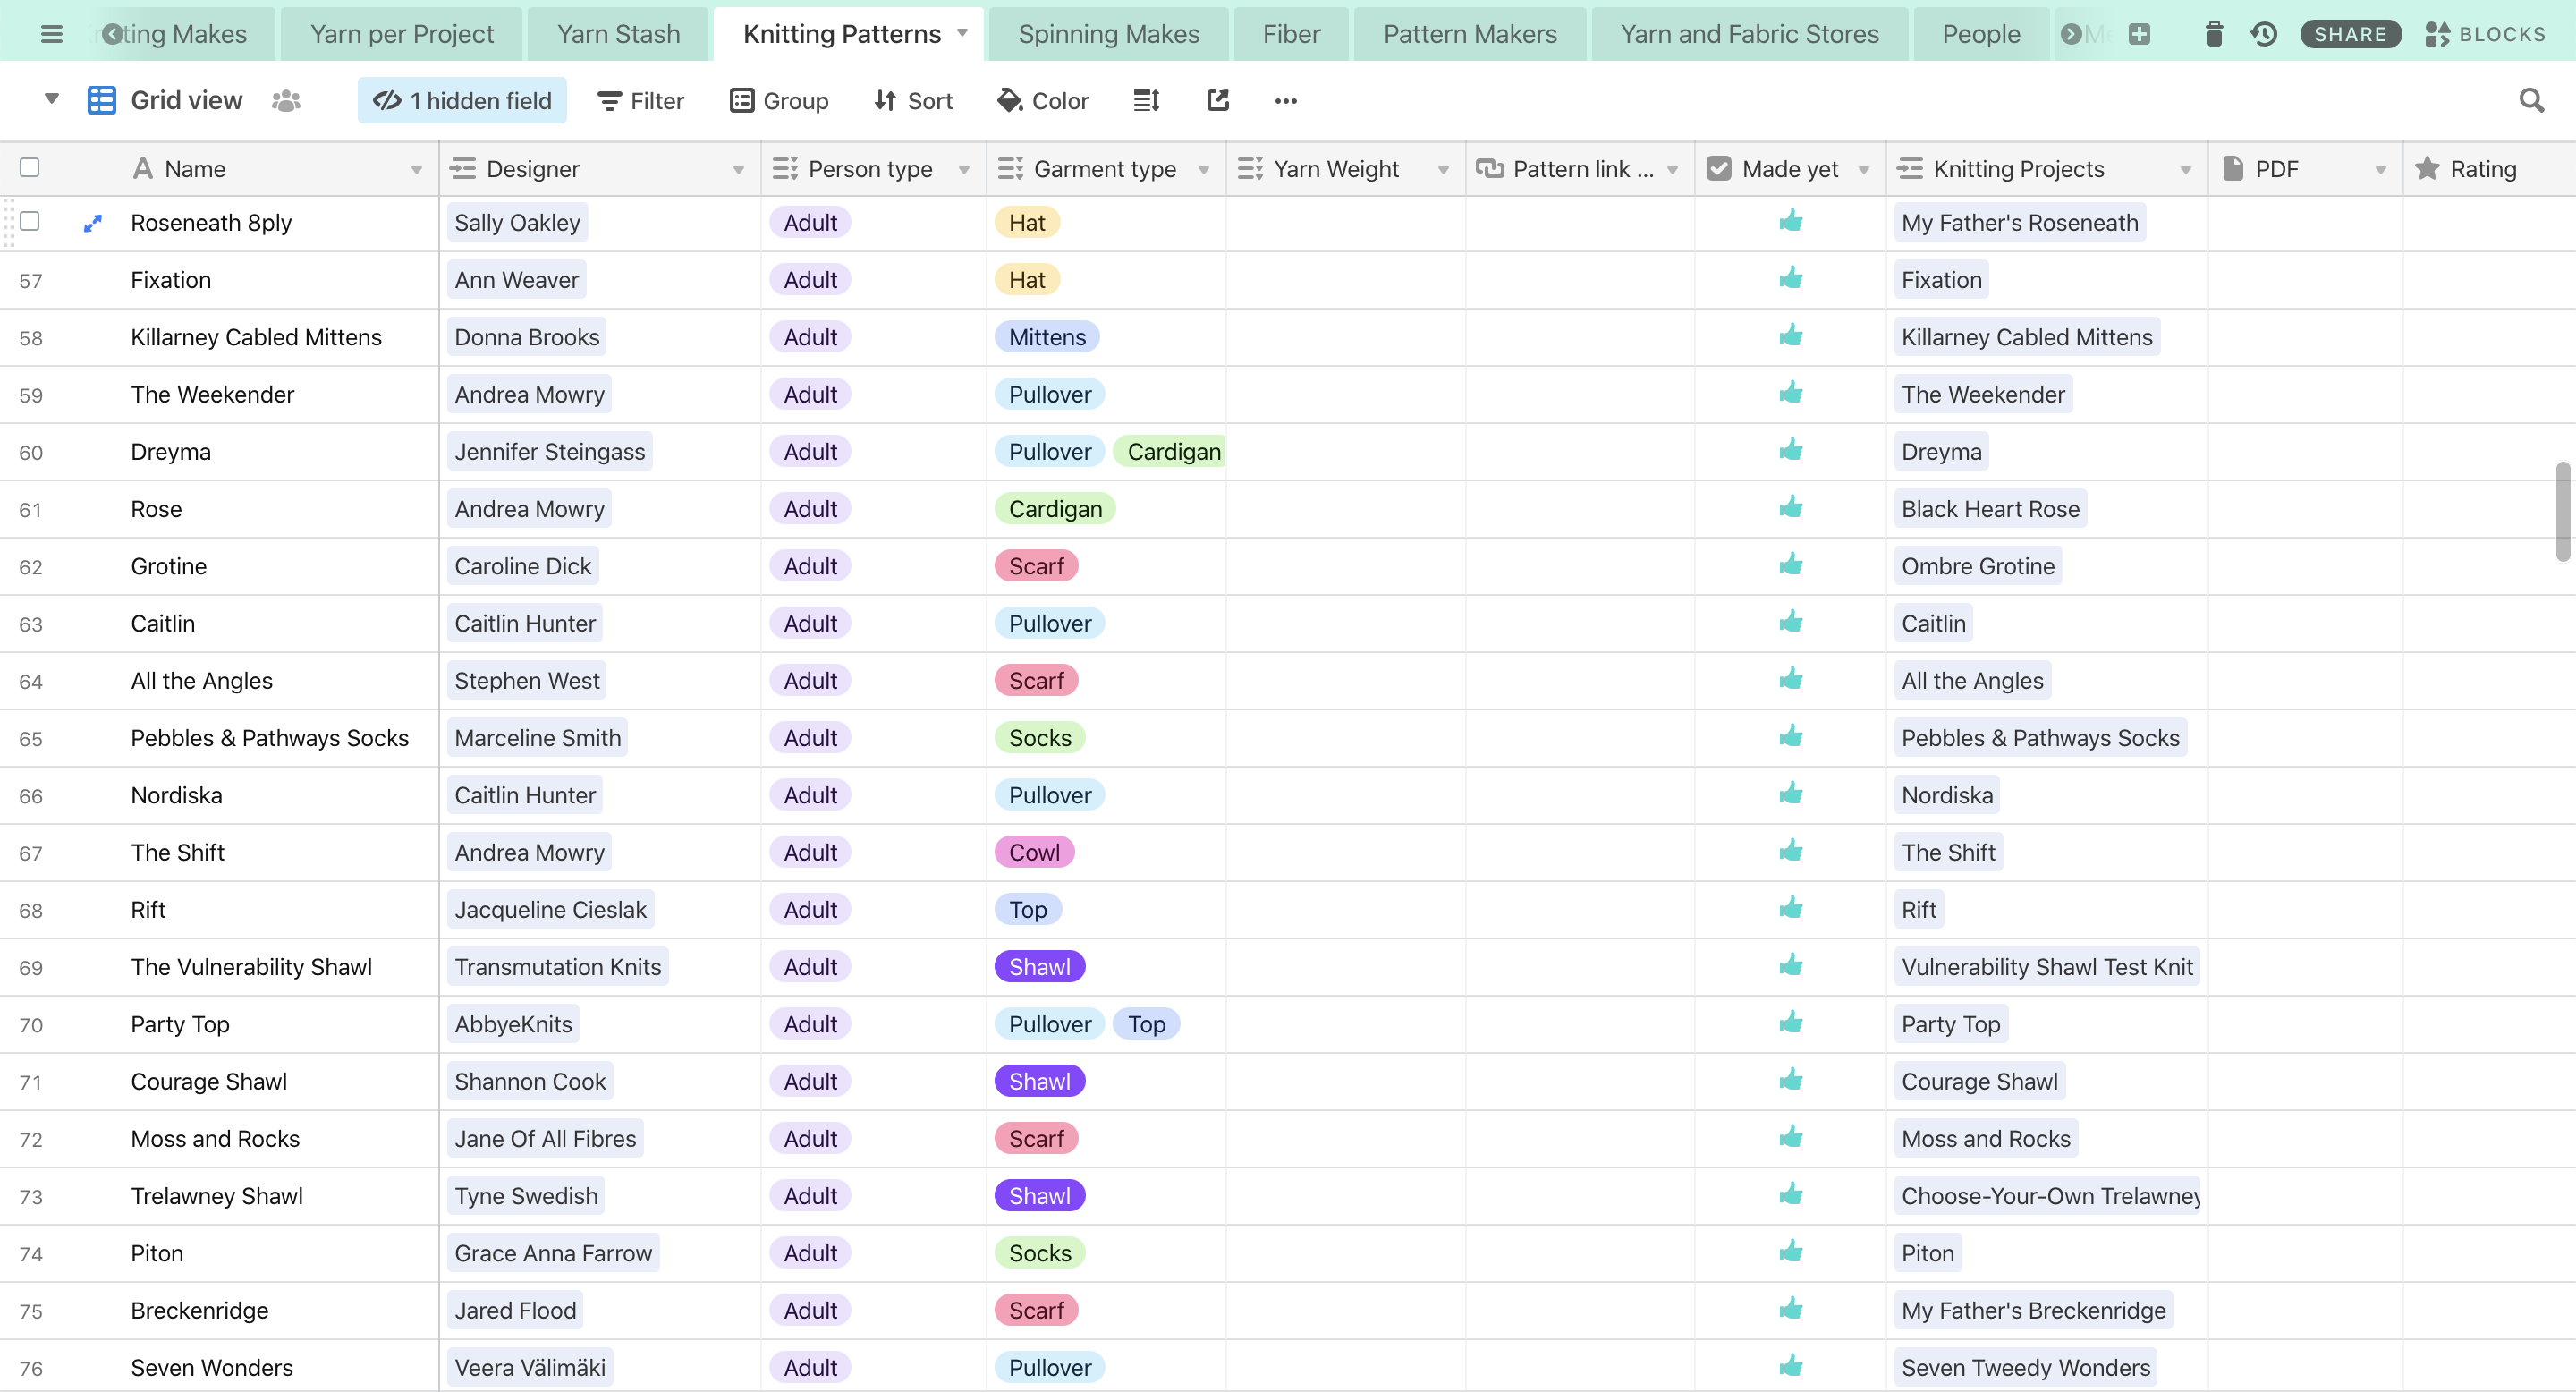
This one is pretty straightforward, if you’ve been reading through — we have two linked columns: one to the designer and one to the knitting projects — and the rest of the fields are single or multi-select, URLs, and notes fields.
Spinning
This has a lot less in it because I have only just started spinning, but I put in fields for information that I want to keep track of. As I keep learning and spinning more I may add more features, but I might also find that this does the job perfectly well.
Spinning Makes

-
Twist Direction (multi-select)
I put four options in here — two for singles (S or Z) and two for plied (also S or Z). This may be something I’ll change as I keep learning to spin and using this to keep track of it. -
Finished Yarn (links to Yarn Stash tab)
This is the rarely-used Spinning Makes field that links the fiber I spun to the yarn that I could actually use for the project.
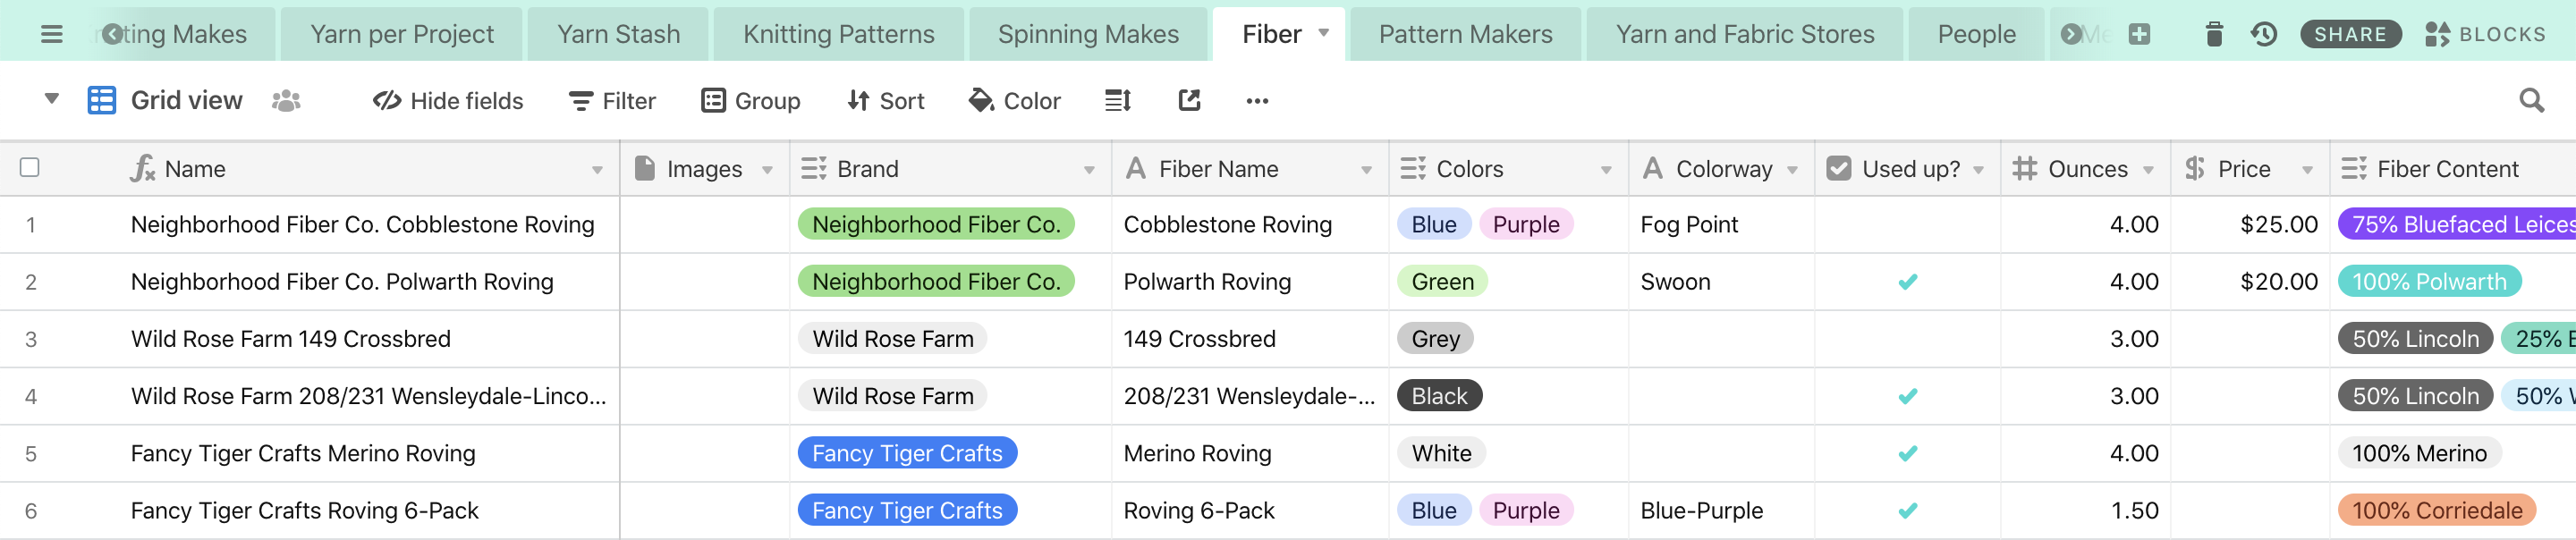
Fiber
-
Name (formula combining Brand + Fiber Name)
As with my Yarn tab, I made this a formula that combined the most common things I would search for. If my fiber stash gets too out of hand, I’ll probably add in the option for colorway as well, to help me differentiate between all the Neighborhood Fiber Co. I will continue to buy. -
Used Up? (checkbox)
I opted to add this checkbox because so far, I’ve been spinning the entire amount of my fiber into one final yarn product. If that changes, I might update this to function more like the yarn stash with weights/amounts rather than an all-or-nothing field. -
Spinning Makes (links to Spinning makes tab)
The Combined View
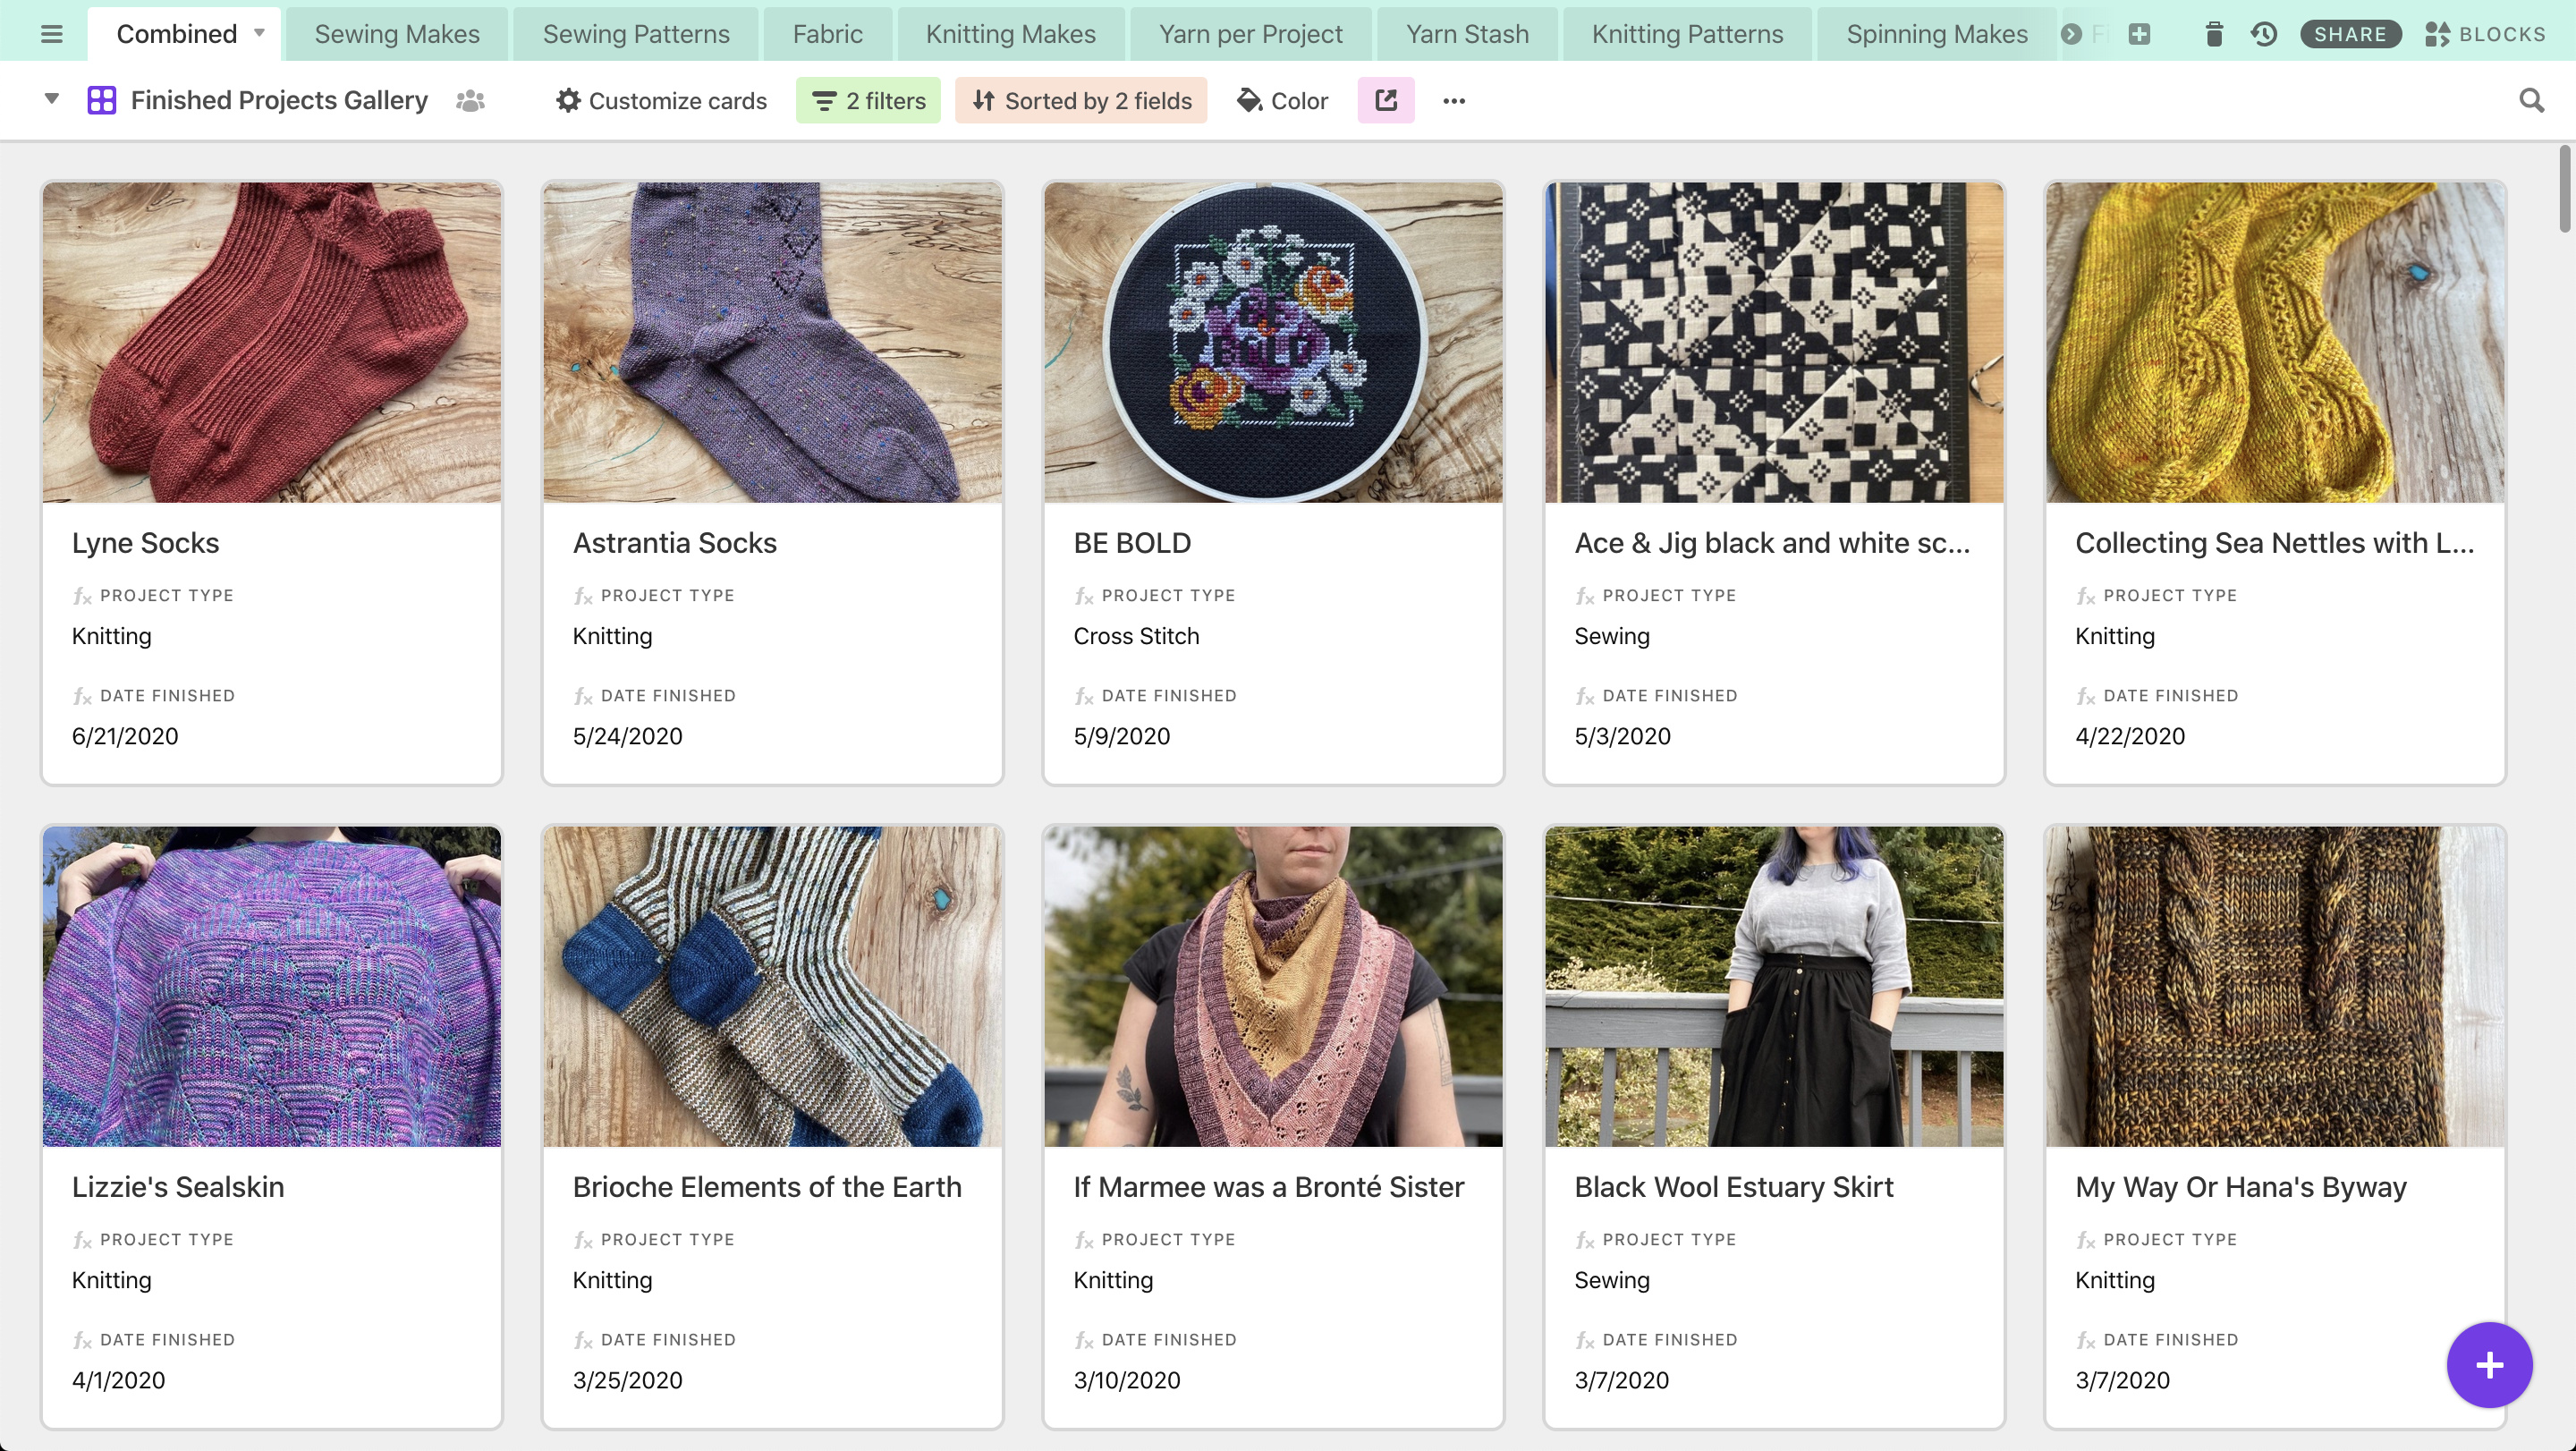
This is where it all comes together: all of my projects, in one place, with start/finish dates and pictures. There’s probably some more work I’ll do here — I haven’t decided exactly how much else I want to pull in, but I’ve started with project type, date started, date finished, and photos. This has almost no original data — the Cover Photo is the only field, and that’s only because photos don’t have the same rollup/formula capability that text and date fields have, so I created an original photo field and just copy-paste over from the lookups. My favorite view on this one is the Gallery view (above), where I can see pictures of everything and a couple details.
NOTE: Because everything here is a formula, I usually create this record from the associated project page: in Knitting Makes, I click the plus icon to link to a record in Combined, and then just choose “create new record”. Based on the formulas, it automatically fills in everything else on this tab.
-
Name (formula)
This pulls in the project Name from the sewing, knitting, or spinning record. The way this formula (and most in this tab) works is: if there’s text in the Sewing Makes column, display that; otherwise, if there’s text in the Knitting Makes column, display that; otherwise, if there’s text in the Spinning Makes column, display that. -
Cover Photo (photo)
Because it’s easier, I usually just copy the pictures from the lookup fields for each project type and paste them over into this one. And then, because this is my “finished projects” view, I usually delete my WIP pictures, but of course you can do whatever you want to with your pictures. -
Project Type (formula)
This formula is similar to the Name formula above: if there’s text in the Sewing Type lookup column (which pulled in the sewing project type), display that; otherwise, if there’s text in the Knitting Type column (which pulled in the knitting project type), display that; otherwise, it’s a spinning project (assumed because the other two will always have an identified type). -
Sewing, Knitting, Spinning Photo fields (lookup)
Again, I already did all the work here, so once you link a record it will fill in the appropriate fields automatically -
Date Started (formula)
The formula pulls in the date from whichever lookup column is filled out (sewing, knitting, or spinning). -
Date Finished (formula)
The formula pulls in the date from whichever lookup column is filled out (sewing, knitting, or spinning).
-
Finished? (formula based on Date Finished)
I made this primarily so I can create a filter on finished: yes or finished: no, rather than trying to mess with filtering on dates and empty fields. -
Links to Projects/Makes tabs:
-
Sewing Makes (link to Sewing Makes tab)
-
Knitting Makes (link to Knitting Makes tab)
-
Spinning Makes (link to Spinning Makes tab)
These are also technically “original” records because you do have to add the data yourself, but if you’ve done it from your project record it’s already filled in on this end, so I consider them more automatic than not.
-
Other Tabs
Since this blog post is already a novel, I’m going to go less in-depth on these, but hopefully by now you’re familiar with the way Airtable works in general and the way I’ve set up this template.
Pattern Makers
I decided to use only one tab for pattern makers — both sewing and knitting — because the information collected about these individuals or companies is essentially the same: name, website, types of patterns made (this will also useful for knit+crochet designers), and links to the projects.
Yarn and Fabric Stores
Again, I decided to use one tab for all stores, because several stores I buy from stock fabric, yarn, and fiber, so it doesn’t make sense to separate these. I created a column for whether I’m buying from an individual vendor (usually indie dyer) or a store; whether they sell yarn, fabric, or both; where they’re located; and URLs to their online shops.
People & Measurements
These are two separate tabs, but I’ll talk about them at the same time. The People tab is fairly straightforward — who have I made things for? What’s nice about having these as linked records is that I can add a rollup (sum) of how many knitting or sewing projects I’ve made for a particular person (spoiler: not many). The Measurements tab will be useful for me to keep track of my own measurements but also to make sure that if/when I do make garments or sized things for my friends and family, that I have their measurements as well.
Needle Inventory
I’m going to be honest here: I never liked Ravelry’s needle inventory, because I always wanted to be able to do more with it. In typical Jane fashion, I might have made this more complicated than it needs to be, but it works for me and that’s really what counts here. I’m keeping track of my interchangeable needles (brand + length are key differentiators), but also how many interchangeable cords I have of which length and what needles they’ll fit. I’m hoping it saves me rooting around in eight different bags just to see if I have another 24” cord or not.
And there you have it!
Hopefully this was somewhat useful and helped explain a bit more about Airtable, the template I created, and how I’ve been using it. Again, the Airtable template can be found here, you can sign up for a free account forever, and if I missed anything or you’d like to know more, please let me know.